This information describes how to check your blood glucose level using a blood glucose meter.
The steps in this resource are specific to the Contour® Next One blood glucose meter and Microlet® Next lancing device. If you’re using a different type of blood glucose meter or lancing device, follow the instructions that came with it. All blood glucose meters and lancing devices are slightly different.
About the Microlet Next lancing device
Your lancing device holds the lancet (needle) you’ll use to prick your finger. It has 6 main parts (see Figure 1).
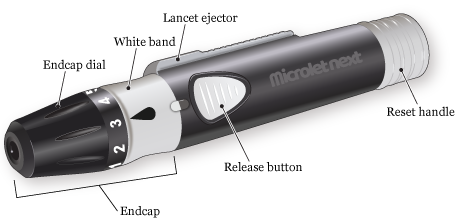
- The endcap covers the lancet until you’re ready to use it.
- The endcap dial controls how deeply the lancet will prick your finger.
- The white band connects the endcap to the rest of the lancing device. The endcap is locked onto the lancing device when the black drop is in line with the release button.
- The release button makes the tip of the lancet spring out to prick your finger.
- The reset handle resets the lancet if you need to prick your finger again.
- The lancet ejector pushes the lancet out of the lancing device once you’re done using it.
Your Microlet Next lancing device works with Microlet lancets. Microlet Next lancets come in different colors, but there’s no difference between them.
About your Contour Next One blood glucose meter
A blood glucose meter measures the amount of sugar in your blood. It has 3 main parts (see Figure 2).
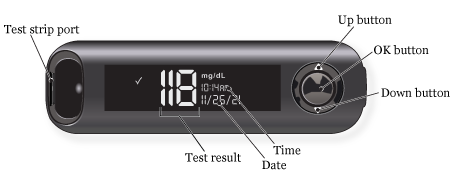
- The test strip port is where you’ll put the blood glucose test strip into the meter. Your Contour Next One glucose meter will only work with Contour Next test strips.
- The screen shows information such as the meter’s status, your blood glucose level, and the date and time.
-
The buttons are how you control the meter.
- To scroll up, press the up button. Hold it to keep scrolling.
- To scroll down, press the down button. Hold it to keep scrolling.
- To accept a selection, press the OK button.
- To turn your meter on or off, press and hold the OK button.
You need to set up your meter before using it for the first time.
You do this by:
- Accepting the blood glucose target range of 70-180 milligrams per deciliter (mg/dL).
- Setting the time.
- Setting the date.
Your meter will not work until you set it up.
Watch Contour® Next One Video: Doing Your First Test for instructions on how to set up your meter.
Do not put your glucose meter under water. If you notice it’s dirty, wipe it with a damp cloth or alcohol pad.
The Contour Diabetes app
The Contour Diabetes app works with your Contour Next One blood glucose meter. It lets you make notes, set reminders, see your results in a graph, and share your reports. If you want to use the app, you can download it from the Apple App Store® or Google Play™ store.
You do not need to download the Contour Diabetes app if you do not want to. The Contour Next One blood glucose meter works without the app.
The Contour Next One user guide
To learn more about the Contour Next One blood glucose meter and Contour Diabetes app, read the Contour Next One user guide. You can read the copy that came with your meter or find it at www.contournextone.com/getting-started.
Instructions for checking your blood sugar
Your healthcare provider will tell you how often to check your blood glucose. They’ll also tell you what your blood glucose level should be. This is called your blood glucose target range. Your blood glucose target range is based on your overall health and current treatment plan.
When you’re ready to start, wash your hands with soap and water. Dry them very well. Touching a blood glucose test strip with damp hands can damage it or make your result less accurate.
Gather your supplies
Set up your supplies on a clean surface. It’s helpful to arrange them in the order you’ll use them (see Figure 3).

You’ll need:
- Your lancing device.
- A new lancet.
- Your blood glucose meter.
- Your blood glucose test strips.
- An alcohol pad (if you do not have access to a sink to wash your hands).
- A dry tissue or gauze pad (if you do not have access to a sink to wash your hands).
- Your blood glucose log.
- A trash can.
- A solid container to throw away the used lancet, such as a heavy plastic laundry detergent bottle with a lid. Read How to Store and Get Rid of Your Home Medical Sharps for more information about choosing a container.
When you take a blood glucose test strip out of the container, set it on top of your meter. This helps keep it clean and dry and makes it easier to pick up. Make sure to close the glucose test strip container tightly. Humidity from the air can damage the strips.
Get your lancing device ready
-
Twist the white band on your lancing device to the right to unlock the endcap (see Figure 4).
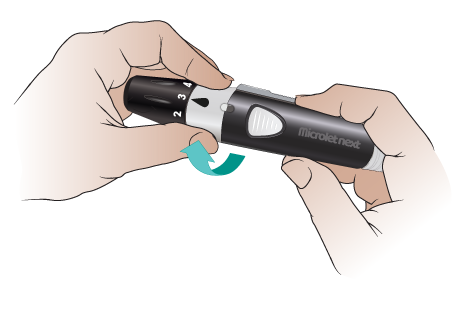
Figure 4. Twist the white band to the right - Pull the endcap straight off (see Figure 5).

- Carefully twist the round tab 3 times. Be careful not to bend it. Pull the tab off and set it aside to use later (see Figure 6). You should see a small needle where the tab was.

- Put the endcap back on your lancing device in the unlocked position (see Figure 7).

-
Twist the white band to the left to lock the endcap on (see Figure 8).

Figure 8. Twist the white band to the left -
Turn the black part of the endcap dial to set the puncture depth (see Figure 9). It’s best to start with level 1 or 2. You can set it to a higher level if you do not get a big enough blood drop.

Figure 9. Set the puncture depth
Your lancing device is now ready. Set it down. Pick up your blood glucose meter and test strip.
Get your blood glucose meter ready
- Hold the test strip with the printed side facing you.
- Hold your blood glucose meter with the screen and buttons facing you.
-
Put the grey square end of the test strip into your meter’s test strip port (see Figure 10).

Figure 10. Put the test strip into the port
Your meter should beep and turn on after you put the test strip in the port. If it does not:
- Make sure you pushed the test strip all the way into the port.
- Make sure the end of the test strip with the grey square is in the port.
- Make sure the printed side of the test strip is facing you.
Your blood glucose meter is now ready. It will stay on for 3 minutes after you put in the test strip. If you do not apply a drop of blood to the tip of the test strip in that time, it will beep and turn off. If this happens, pull the test strip out and put it back into the port.
Do not apply blood to the test strip before you put it into the meter or when the meter is off. If you do, that strip will be ruined. You’ll have to start over with a new one.
Prick your finger
-
Choose which finger you’re going to prick. We recommend using the side of your fingertip (see Figure 11). The middle and top of your fingertip are more sensitive.
- Use a different spot each time. This will help prevent sore spots. Remember that you can use both sides of each fingertip.
- If you have not already washed your hands, clean the area with the alcohol pad. Dry it with the clean tissue or gauze pad.

Figure 11. Hold the lancing device firmly against the side of your finger -
Hold your lancing device firmly against the side of your finger (see Figure 12) and press the release button. Then move the lancing device away from your finger right away. Look for a blood drop.You may need to gently massage or squeeze your finger (see Figure 12). Do not do this too hard. If you do, your results may not be accurate.If the blood drop is too small, you’ll need to prick your finger again. It’s OK to use the same lancet.

Figure 12. Gently squeeze your finger to get a blood drop
a. Pull the white reset handle on your lancing device until you hear it click into place (see Figure 13).

b. Turn the endcap dial to increase the puncture depth by 1 level.
c. Make sure you have the lancing device pressed firmly against the side of your finger.
d. Press the release button. Then move your lancing device away from your finger right away.
e. Look for a blood drop. You may need to massage your finger gently. If the blood drop is bigger than you needed, lower the puncture depth by 1 next time you use your lancing device. This means the lancet will not prick your finger as deeply.
Touch the blood glucose test strip to the blood drop
-
Once you have a big enough blood drop, touch the tip of the test strip to the drop (see Figure 14). The blood will be drawn into the test strip. Putting the blood on the top, bottom, or side of the strip will not work.
- If there is not enough blood on the first try, your meter will beep twice, and a blood drop will flash on the display. You can apply more blood to the test strip within 60 seconds.
- If you do not apply enough blood within 60 seconds, your meter will show an error code. If this happens, pull out the test strip and throw it away. Start again with a new test strip. Increase the puncture depth on your lancing device, if needed.

Figure 14. Touch the end of the test strip -
When you’ve applied enough blood to the test strip, your meter will beep and count down from 5. Your blood glucose level will appear on the screen and you’ll see a color near the test strip port. This is called the Target Light or smartLIGHT. You’ll see green if your result is in the target range, yellow if it’s too high, or red if it’s too low.
- When you first get your Contour Next One blood glucose meter, the target blood glucose range will be 70 to 180 mg/dL.
- If your diabetes provider gives you a different target range, you can change it using the Contour Diabetes app.
- If you do not want to use the smartLIGHT feature, you can turn it off using the Contour Diabetes app.
Write down your blood sugar level
Write your blood glucose level in your blood glucose log. Your result will stay on the screen until you take out the test strip or for 3 minutes.
Make sure your blood glucose meter is right-side up when you read it. To quickly check, make sure you can read the time and date.
Throw away the test strip and used lancet
-
Firmly pull the test strip out of your blood glucose meter (see Figure 15). Throw it away in the trash can. It’s OK to put it with your regular trash.
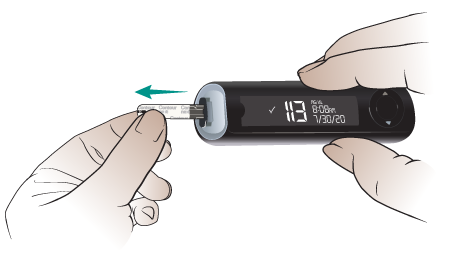
Figure 15. Pull the test strip out of your blood glucose meter - Twist the white band on your lancing device to the right to unlock the endcap. Pull the endcap straight off.
-
Put the round plastic tab you removed from the top of the lancet earlier on a flat surface. Push the end of the lancet firmly into the plastic tab (see Figure 16). The tab will cover the lancet so you will not accidentally prick yourself.

Figure 16. Push the end of the lancet into the plastic tab -
Hold the lancet over your plastic sharps container. Slide the lancet ejector forward until the lancet falls into the plastic sharps container (see Figure 17).
- Do not pull the lancet out with your fingers. The plastic tab can easily come off. If it does, you may prick yourself with the needle.

Figure 17. Eject the lancet into the sharps container - Slide the lancet ejector back into place. Put the endcap back on your lancing device. Twist the white band to the left to lock on the endcap.
Keeping track of your results
- Your healthcare provider will tell you how to keep track of your blood glucose levels and medicine doses. Follow their instructions.
- Bring your blood glucose log to all your appointments. This information will help your healthcare provider decide if they should change your current treatment plan. If you have questions about checking your blood glucose, ask your healthcare provider.
Where to buy supplies
Talk with your diabetes healthcare provider to get a refill prescription for blood glucose test strips and lancets. You must get refills from your local pharmacy. MSK’s outpatient pharmacy does not carry these supplies.
If your blood glucose meter is battery-powered, make sure to always have extra batteries. The Contour Next One blood glucose meter uses 2 CR-2032 batteries. You can buy these batteries online or at your local electronics store, hardware store, or supermarket.
