This information explains implanted ports, port placement, and how to care for your port. An implanted port is often called a mediport or port-a-cath. A port protects your veins during cancer treatment.
What is an implanted port?
An implanted port is a type of central venous catheter (CVC). A CVC is a flexible tube that’s put into one of your veins.
You may need to get medication in a vein larger than the ones in your arms. Your port lets the medication go into your bloodstream through your vein. It can be used to give you medication for several days in a row.
A port protects your veins from damage from repeated access. A port makes it easier for your care team to:
- Collect blood samples.
- Give you intravenous (IV) medication. This is medication that’s put into one of your veins. Some IV medications, such as anesthesia and some types of chemotherapy (chemo), must go through a large vein.
- Give you IV fluids.
- Give you IV blood products, such as platelets and plasma.
- Give you IV contrast. This is a special dye that helps your healthcare provider see your organs better.
Your healthcare provider will tell you if getting a port is best for you and your treatment.
A surgeon or interventional radiologist (also called an IR doctor) will place your port. An IR doctor is a doctor who is a specialist in image-guided procedures. They usually will place your port in your chest. A port sometimes can go into your upper arm instead. Your healthcare provider will talk with you about where your port will be placed.
Ports placed in the chest usually are about 1 inch (2.5 centimeters) below the center of your right collarbone (see Figure 1). This allows for the most direct access to your vein. If you wear a bra, your port will be about 1 inch from where your bra strap lies.
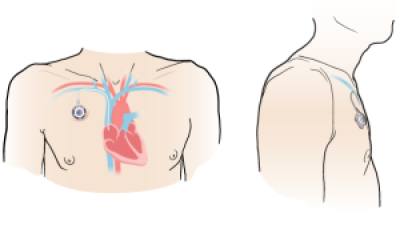
Figure 1. Front view of port (left) and side view of port (right)
Your port may raise your skin about ½ an inch (1.2 centimeters). You may be able to feel it through your skin. Most people will not be able to tell that you have a port. Your port will not set off metal detectors.
Your port can stay in place for years. Your healthcare provider will remove your port when you don’t need it anymore. They also will remove it if it gets infected. You can have another port put in later, if you need one.
Parts of your implanted port
The parts of the implanted port are the port, septum, and catheter (see Figure 2).
Port and septum
The port is the starting point for fluids to flow through the catheter. It sits under your skin and has a raised center called a septum. This is the part of the port where needles will be placed. It’s also called the access point.
The septum is made from a self-sealing rubber material. Nothing can enter the port without a needle in it. The septum closes once the needle is removed.
Catheter
The catheter is a thin, flexible plastic tube. One end is connected to your port. The other end sits in your vein.
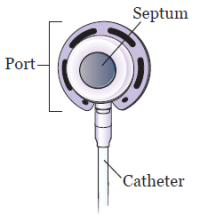
Figure 2. Parts of your port
Types of implanted ports
Ports can be shaped like a circle, oval, or triangle. Your port may be a Mediport®, BardPort®, PowerPort®, or Port-A-Cath®. They can be a single lumen port or a double lumen port (see figure 3). Your healthcare provider will choose the one that’s best for you and your treatments.
Single lumen port
A single lumen port has 1 access point. Most people get a single lumen port.
Double lumen port
A double lumen port has 2 access points. You can put a needle in each access point. You may get a double lumen port if you usually need more than 1 point of access for treatment.
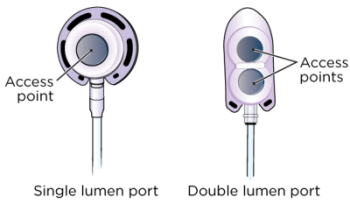
Figure 3. Single (left) and double (right) lumen ports
Power-injectable ports
Most implanted ports are made to be used during imaging tests. These include computed tomography (CT) scans or magnetic resonance imaging (MRI). These ports let you have high speed injections (shots) of contrast. These are called power-injectable ports (see Figure 4).
Your healthcare provider will tell you if you have a power-injectable port. They will also give you a wallet card with information about your port. Carry this card with you at all times.
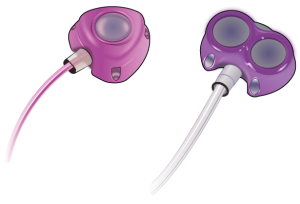
Figure 4. Single (left) and double (right) power-injectable ports
What to do before your implanted port placement procedure
About 1 week before your procedure, you will meet with the procedure team for a pre-procedure visit. During this visit, they will teach you more about your new port and how to care for it. You should also have a family member or friend learn with you.
Ask about your medications
You may need to stop taking some of your medications before your procedure, including:
- Vitamin E.
- Aspirin.
- Anticoagulants (blood thinners)
- Insulin, or other medicines for diabetes.
- Weight loss medicines
Talk with your doctor about which medications are safe for you to stop taking.
If you’re taking any other medications, ask the doctor who prescribed the medications if you should stop taking them before your procedure.
If you take any medications in the morning, talk with your doctor about which medications you should take before your procedure. Your doctor may tell you to wait until after your procedure to take some of your medications.
Note the time of your procedure
A staff member will call you between and the day before your procedure. If your procedure is scheduled for a Monday, they will call you on the Friday before. If you don’t get a call by , call 212-639-5948.
The staff member will tell you what time to arrive at the hospital for your procedure. They will also remind you where to go.
Visit www.msk.org/parking for parking information and directions to all MSK locations.
How to get ready for your implanted port placement procedure
Your port placement procedure will take place in the operating room. Your healthcare provider will tell you how to get ready.
Take devices off your skin
You may wear certain devices on your skin. Before your scan or procedure, device makers recommend you take off your:
- Continuous glucose monitor (CGM)
- Insulin pump
Talk with your healthcare provider about scheduling your appointment closer to the date you need to change your device. Make sure you have an extra device with you to put on after your scan or procedure.
You may not be sure how to manage your glucose while your device is off. If so, before your appointment, talk with the healthcare provider who manages your diabetes care.
Arrange for someone to take you home
You must have a responsible care partner take you home after your procedure. A responsible care partner is someone who can help you get home safely. They should be able to contact your care team if they have any concerns. Make sure to plan this before the day of your procedure.
If you don’t have a responsible care partner to take you home, call one of the agencies below. They’ll send someone to go home with you. There’s a charge for this service, and you’ll need to provide transportation. It’s OK to use a taxi or car service, but you still need a responsible care partner with you.
| Agencies in New York | Agencies in New Jersey |
| VNS Health: 888-735-8913 | Caring People: 877-227-4649 |
| Caring People: 877-227-4649 |
What to do the day before your port placement procedure
Instructions for eating
Stop eating at midnight (12 a.m.) the night before your surgery. This includes hard candy and gum.
Your healthcare provider may have given you different instructions for when to stop eating. If so, follow their instructions. Some people need to fast (not eat) for longer before their surgery.
What to do the day of your port placement procedure
Instructions for drinking
Between midnight (12 a.m.) and 2 hours before your arrival time, only drink the liquids on the list below. Do not eat or drink anything else. Stop drinking 2 hours before your arrival time.
- Water.
- Clear apple juice, clear grape juice, or clear cranberry juice.
- Gatorade or Powerade.
-
Black coffee or plain tea. It’s OK to add sugar. Do not add anything else.
- Do not add any amount of any type of milk or creamer. This includes plant-based milks and creamers.
- Do not add honey.
- Do not add flavored syrup.
If you have diabetes, pay attention to the amount of sugar in your drinks. It will be easier to control your blood sugar levels if you include sugar-free, low-sugar, or no added sugar versions of these drinks.
It’s helpful to stay hydrated before surgery, so drink if you are thirsty. Do not drink more than you need. You will get intravenous (IV) fluids during your surgery.
Stop drinking 2 hours before your arrival time. This includes water.
Your healthcare provider may have given you different instructions for when to stop drinking. If so, follow their instructions.
Instructions for medications
Take only the medications your doctor tells you to take the morning of your procedure. Take them with a small sip of water.
Things to remember
- You can shower as you normally would before your procedure. Your healthcare provider may tell you to shower with a special soap called Hibiclens the night before. If they do, read the “Showering with an antiseptic skin cleanser (such as Hibiclens)” section of this resource.
- Don’t put on any lotion, cream, powder, deodorant, makeup, powder, perfume, or cologne.
- If you wear contact lenses, wear your glasses instead. Wearing contact lenses during your procedure can damage your eyes.
- Don’t wear any metal objects. Remove all jewelry, including body piercings. The equipment used during your procedure can cause burns if it touches metal.
- Leave valuable items (such as credit cards and jewelry) at home.
- You will need to remove certain items before you go into the operating room. This includes hearing aids, dentures, prosthetic device(s), wig, and religious articles.
What to bring
- A case for your glasses, if you wear them.
- Loose, comfortable clothes to wear after your procedure.
- A small pillow or towel, if you’re traveling home in a car. You can use this to protect your incision (surgical cut) from the seatbelt.
- Your Health Care Proxy form and other advanced directives, if you completed them.
- Your medication, if you take any.
What to expect when you arrive
Many staff members will ask you to say and spell your name and birth date. This is for your safety. People with the same or similar names may be having a procedure on the same day.
You will fill out a brief questionnaire if you have not already done so through MyChart, the patient portal.
You will get sedation (medicine to help you feel calm) through a catheter. The catheter may be an IV in your arm or hand. It may also be a CVC, such as a peripherally inserted central catheter (PICC), if you already have one. A member of your care team will go over this with you before your procedure.
A staff member will bring you to the procedure room when it’s time to place your port.
Meet with a nurse
You’ll meet with a nurse before your procedure. Tell them the dose of any medications you took after midnight (12 a.m.) and the time you took them. Make sure to include prescription and over-the-counter medications, patches, and creams.
Your nurse may place an intravenous (IV) line in one of your veins, usually in your arm or hand. If your nurse does not place the IV, your anesthesiologist will do it in the procedure room.
Meet with an anesthesiologist
You will also meet with an anesthesiologist (A-nes-THEE-zee-AH-loh-jist). An anesthesiologist is a doctor with special training in anesthesia. They will give you anesthesia during your procedure. They will also:
- Review your medical history with you.
- Ask if you’ve had any problems with anesthesia in the past. This includes nausea (feeling like you’re going to throw up) or pain.
- Talk with you about your comfort and safety during your procedure.
- Talk with you about the kind of anesthesia you’ll get.
- Answer questions you have about anesthesia.
Inside the operating room
Once you’re in the operating room, your healthcare provider will inject (give you a shot) of local anesthesia. Local anesthesia is medication to numb an area of your body. Your healthcare provider will inject the anesthesia into your neck and chest.
You may also need general anesthesia to have your port placed. General anesthesia is medicine to make you sleep during your procedure.
Your doctor will make a small incision (surgical cut) at the base of your neck (see Figure 5). It will be about 1 to 1.5 inches (2.5 to 4 centimeters) long. They will make a second small incision of about 0.5 inches (1 centimeter) long on your chest, under your collarbone. Then, they will make a pocket under your skin. This will hold your port in place.
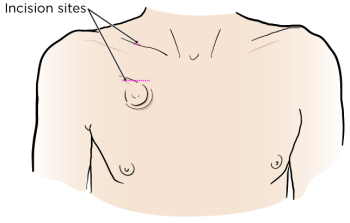
Figure 5. Incision sites for port placement
Your healthcare provider will place the catheter through the second incision and connect it to your vein.
Your care team will use sutures (stitches) or surgical glue called Dermabond® to close your incisions. If you have sutures, they will be absorbed into your body. You will not need to have them removed. They may also use Steri-StripsTM. These are short, thin strips of surgical tape that are stronger than a regular bandage.
Your procedure should take about 1 hour.
What to do after your port placement procedure
In the Post-Anesthesia Care Unit (PACU)
You’ll be in the PACU when you wake up after your procedure. A nurse will be keeping track of your temperature, pulse, blood pressure, and oxygen levels. You may get oxygen through a tube resting below your nose or a mask over your nose and mouth. You’ll also have compression boots on your lower legs.
Tell your nurse if you’re feeling pain. They may give you medication for your pain.
Ask your nurse how long you can expect to stay in the PACU. Your care team will tell you when it’s safe to go home. You will need a responsible care partner to go with you.
Your nurse will take out your IV before you leave the hospital. They will explain how to change the dressing and care for yourself at home.
How to care for your incision site
You will have a bandage covering the small incision on your chest. You can take this bandage off 48 hours (2 days) after your procedure.
You may feel soreness or pain at your incision sites and where the catheter was tunneled under your skin. This should get better in 1 to 2 days. You can take over-the-counter pain medication (medication you get without a prescription) if you need it. You may also notice some bruising.
Wearing a seatbelt may put pressure on your incisions. You can put a small pillow or folded towel between the strap and your body to help with this.
Incisions closed with sutures
If your incisions were closed with sutures:
- You will have 2 small bandages covering your incision.
- Leave your bandages in place for 48 hours, or as long as your healthcare provider tells you to.
- Do not get your bandages wet. You can shower once your bandages are removed.
Incisions closed with Dermabond
If your incisions were closed with sutures:
- You may have small pieces of tape or bandages covering the incisions.
- Do not apply lotion or place adhesive on top of the tape or bandage.
- Do not pick or scratch the Dermabond. It will come off on its own after about 7 to 10 days.
- Your care team will give you instructions for how to shower safely until your incisions heal.
The skin over your port doesn’t need any special care. You can wash it as you normally would. If your care team used Steri-Strips, these will fall off on their own in 7 to 10 days.
Your port will not set off metal detectors.
Bathing and showering
- For the first 24 hours after your procedure, keep your bandage dry. You can take a sponge bath as long as your bandage doesn’t get wet.
- You can take a shower 48 hours (2 days) after your procedure. Don’t soak in a bathtub or pool. You can start taking baths 1 to 2 weeks after your procedure. Your doctor will tell you when this is safe. You can go completely underwater in a bathtub or pool as long as your port isn’t accessed.
-
If your port is accessed while you’re home:
- Cover the clear dressing over the port with a waterproof dressing (such as Aquaguard®). Your nurse can give you instructions for how to use it.
- Shower with Hibiclens every day to protect against infection. Follow the instructions in the “Showering with an antiseptic skin cleanser (such as Hibiclens)” section at the end of this resource.
- When washing, be gentle with your skin around the port site. You can wash gently with soap, but don’t use a washcloth or brush. Rinse your skin well and pat it dry with a soft towel.
- You can start using a washcloth during bathing and showering 2 weeks after your procedure. Avoid scrubbing the area until it’s completely healed. This is usually about 6 weeks after your procedure.
Physical activity after your procedure
Your healthcare provider will give you instructions on what exercises and movements you can do while your incisions are healing. Check with your healthcare provider before starting any exercises, such as:
- Running.
- Stretching.
- Lifting anything over 10 pounds (4.5 kilograms).
- Contact sports, such as football.
Accessing your implanted port
Your healthcare provider will access your port when you need IV fluids or medication. They will do this by placing a needle through the access point (see Figure 6). The fluid or medication will move from your port through the catheter and into your bloodstream.
Only healthcare providers trained in port care should access your port.
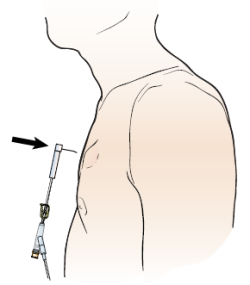
Figure 6. Accessing your port
Your care team may need to access your port the day it’s placed. If they do, they will insert an access needle into the septum when your port is placed.
The needle and port will be covered by a special bandage (dressing) while your port is accessed (see Figure 7). The dressing will help to keep the needle in place. There also can be a small bandage over the top incision. You don’t need a bandage over your port when it’s not being used.
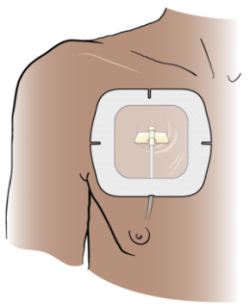
Figure 7. Dressing over your port
Flushing your implanted port
Your port flushes on its own while it’s being used. When it’s not being used, your port will need to be flushed at least every 12 weeks. Depending on when your appointments are, a nurse may flush your port more often. To do this, they will put a needle into your port. They will inject saline (sterile salt water) into your catheter. This is done to make sure the catheter does not get blocked. Your catheter may not work if it is blocked. If this happens, you may need to have your port removed.
Removing your port
Your healthcare provider may remove your port when you no longer need it, or if it gets infected. Talk to your healthcare provider for more information about removing your port.
When to call your healthcare provider
- If you have new or increased pain at the site of your port.
- If you have swelling or a growing bruise at the site of your port.
- If you have pus or fluid coming from your incision(s).
- If you notice your incision(s) are hot, tender, red, irritated, or opening.
- If you have a fever of 100.4° F (38° C) or higher.
- If you have chills.
Contact information
If you have any questions, contact a member of your care team directly. If you’re a patient at MSK and you need to reach a provider after , during the weekend, or on a holiday, call 212-639-2000. Ask for the interventional radiology fellow on call.
Showering with an antiseptic skin cleanser (such as Hibiclens)Follow these instructions for showering with a 4% CHG solution antiseptic skin cleanser. An antiseptic kills germs that can cause disease.
Do not put on any lotion, cream, deodorant, makeup, powder, perfume, or cologne after your shower. |