This information describes how to do simple chair exercises that will increase your strength and help you move more easily.
If you have certain conditions, such as:
- Blood clots
- Broken bones
- Weakened bones
- Recent surgery on your spine, arms, or legs
You may need to modify or skip some of the exercises. Your healthcare provider will tell you which exercises you can do. If you have any concerns, talk with your healthcare provider.
You should also tell your healthcare provider if you have new or increased pain while you’re doing these exercises. You should feel no more than slight strain as you do them. They shouldn’t cause pain.
If you have chest pressure, dizziness, or shortness of breath, stop doing the exercises. Call 911 if your symptoms don’t stop after you rest.
Chair Exercise Tips
- Try to do the exercises for 30 seconds each. It’s OK if you need to stop before 30 seconds. Just be ready to start the next exercise on time.
- Count out loud when you do the exercises to keep your breaths evenly paced.
- Remember that it’s better to do a little exercise than none at all.
- Breathe in through your nose and out through your mouth while you’re doing these exercises. Don’t hold your breath.
Exercise Items
You should have the following item nearby before you start the exercises:
- Chair with armrests
- Pillow
Heel/Toe Raises
You can do this exercise with both feet at the same time.
- Start with your feet flat on the floor. Point your toes up toward your nose while keeping your heels on the floor (see Figure 1).
- Then point your toes down toward the floor and try to lift your heels off the floor (see Figure 1).
- Repeat steps 1 and 2 for 30 seconds, if you can.

Figure 1. Heel/Toe Raises
Seated Marches
- Sit in a chair with armrests.
- Start with your feet flat on the floor.
- Slowly raise 1 knee without leaning back (see Figure 2). You can stop your upper body from leaning backward by holding the armrests.
- Then lower your leg and place your foot back on the floor.
- Repeat with your other leg.
- Repeat steps 1 to 4 for 30 seconds, if you can.

Figure 2. Seated Marches
Alternating Knee Extension
- Sit in a chair.
- Start with your feet flat on the floor.
- Lift and straighten one leg as far as you can. Hold for a count of 1, then bend your knee and try to bring your heel as close to your chair as you can (see Figure 3).
- Lower your leg and place your foot flat on the floor.
- Repeat with your other leg.
- Repeat steps 1 to 5 for 30 seconds, if you can.

Figure 3. Alternating Knee Extension
Knee Abduction/Adduction
- Sit in a chair.
- Place your feet flat on the floor.
- Place your hands on the inside of your knees. Gently push your knees against your hands as they apply counter pressure. Hold for 3 seconds. Then relax.
- Place your hands on the outside of your knees. Gently push your knees outward against your hands as they apply counter pressure. Hold for 3 seconds. Then relax. (see Figure 4)
- Repeat steps 1 to 4 for 30 seconds, if you can.

Figure 4. Knee Abduction/Adduction
Buttock Sets
- Sit up straight in the chair. Rest your arms on the arms of the chair. Place your feet flat on the floor.
- Squeeze your buttocks (butt muscles) together tightly (see Figure 5).
- Hold the position and count out loud to 3.
- Relax your buttocks.
- Repeat steps 1 to 4 for 30 seconds, if you can.
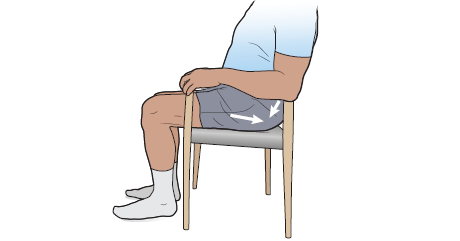
Figure 5. Buttock Sets
W Exercise
- Sit comfortably with your back straight, shoulders back, and head facing forward.
- Form a “W” shape with your arms out to the sides and palms facing forward (see Figure 6). Try to bring your hands up so they’re level with your face. If you can’t raise your arms that high, bring them to the highest comfortable position or rest them on the arms of the chair.
- Bring your elbows to your sides and gently squeeze your shoulder blades back and down, like you’re squeezing a pencil between them. This should make your chest puff out.
- Hold this position for 5 seconds as you breathe in through your nose and out through pursed lips (like blowing out candles). Then relax.
- Repeat steps 1 to 4 for 30 seconds, if you can.

Figure 6. W exercise
Overhead Chest Wall Stretch and 4-8-8 Breathing
- Sit comfortably with your back straight, shoulders back, and head facing forward.
- Place your arms close to your sides.
- Raise your arms up over your head without leaning back (see Figure 7). Breathe in for 4 seconds at the same time as you raise your arms.
- Hold your breath and keep your arms up for 8 seconds, if you can (see Figure 7).
- Breathe out through pursed lips (like blowing out candles) for 8 seconds as you lower your arms while keeping them straight.
- Repeat 3 times, if you can.
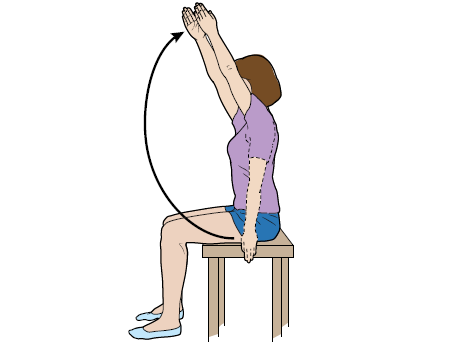
Figure 7. Overhead Chest Wall Stretch and 4-8-8 Breathing