This information describes exercises you can do to help manage lymphedema (swelling) in your arms, upper body, or both.
Exercises that help manage lymphedema are called decongestive (DEE-kun-JEH-stiv) exercises. They’re an important part of managing lymphedema. They help move lymph fluid around your body. They may also help you move better.
Talk with your healthcare provider before you start to do these exercises. They may change how often you do the exercises or how many times you repeat them. They may also change how you do some of the exercises. Follow their instructions.
With any exercise program, it’s important to build up slowly over time. Start out doing fewer reps and holding for less time. Work up to doing more reps and holding for longer. This lets your muscles get used to the exercises.
General instructions
- Do the exercises in the order they’re listed in this resource.
- Repeat each exercise 10 times, if you can. It’s helpful to count each repetition (rep) out loud.
- Do these exercises twice a day.
What to do before doing these exercises
- Dress comfortably. Your clothes should not limit your movements.
- If you have bandages or compression garments, wear them when you exercise.
What to do while doing these exercises
- Do not hold your breath. Counting each rep out loud can help.
- Only move as far as you can without feeling pain. Talk with your healthcare provider if you have questions about how to do any of the exercises.
-
You can do all these exercises while lying down, sitting, or standing. It’s most important to do them in a comfortable position while keeping good posture. Here are some suggestions for good posture:
- Look forward with your chin tucked slightly.
- If you’re sitting, choose a supportive chair. Sit up straight with your feet flat on the ground. Keep your knees in line with your ankles and your shoulders in line with your hips.
- If you’re standing, keep your hips, knees, and ankles in line with your shoulders. Keep your feet flat on the ground.
Deep breathing exercise
It’s easiest to do this exercise lying on your back. You can also do it while sitting or standing.
- Place one or both of your hands over your abdomen (belly).
-
Breathe in slowly and deeply through your nose. Your abdomen should rise (see Figure 1), but your upper chest should stay still and relaxed.

Figure 1. Breathe in so your abdomen rises - Breathe out slowly through pursed lips, like you’re blowing out candles. As you breathe out, slowly and gently pull your abdomen towards your spine.
Repeat 10 times.
Neck exercises
Neck rotation
- Start by looking forward with your shoulders relaxed.
-
Slowly turn your head to look over your right shoulder (see Figure 2).

Figure 2. Look over your right shoulder - Slowly go back to the starting position.
-
Slowly turn your head to look over your left shoulder (see Figure 3).

Figure 3. Look over your left shoulder - Slowly go back to the starting position.
Repeat 10 times.
Neck side bend
- Start by looking forward with your shoulders relaxed.
-
Slowly tilt your head to bring your left ear to your left shoulder (see Figure 4).

Figure 4. Tilt your head to the left - Slowly go back to the starting position.
-
Slowly tilt your head to bring your right ear to your right shoulder (see Figure 5).

Figure 5. Tilt your head to the right - Slowly go back to the starting position.
Repeat 10 times.
Shoulder exercises
Backward shoulder rolls
- Start with your arms relaxed at your sides.
-
In a circular motion, bring your shoulders forward, up, backward, and down (see Figure 6). Try to make the circle as big as you can and move both shoulders at the same time.

Figure 6. Roll your shoulders in a circle
Repeat 10 times.
If you have some tightness across your chest, start with smaller circles. Make them bigger as your muscles get looser.
Shoulder blade squeezes
- Start with your arms relaxed at your sides and your palms facing up.
-
Gently squeeze your shoulder blades back and down (see Figure 7). As you’re doing this, breathe in through your nose to make your chest puff out.

Figure 7. Squeeze your shoulder blades back and down - As you breathe out, release the squeeze and go back to the starting position. Rest for a few seconds.
Repeat 10 times.
Arm exercises
You can do most of these exercises with 1 or both arms at a time. You may find it more comfortable to do them with 1 arm at a time.
Shoulder raise
- Start with your arms relaxed at your sides.
-
With your palms facing each other, raise your arms in front of you and up over your head (see Figure 8). If one arm is weaker than the other, clasp your hands together.

Figure 8. Raise your arms in front of you - Go back to the starting position.
Repeat 10 times. If you do this exercise with 1 arm at a time, repeat 10 times with each arm.
Sideways arm raises
- Start with your arms relaxed at your sides.
-
Slowly raise your arms out to the sides as far as you can (see Figure 9). Try to raise them above your head, if you can.

Figure 9. Raise your arms to the side - Go back to the starting position.
Repeat 10 times. If you do this exercise with 1 arm at a time, repeat 10 times with each arm.
Shoulder wings
- Start with your hands clasped together in front of you.
- Slowly raise your hands, keeping them clasped together (see Figure 10, left). Slide them over your head until they’re resting on the back of your head or neck (see Figure 10, center). Be careful not to pull your neck and head forward.
-
Spread your elbows as far apart as you can (see Figure 10, right).
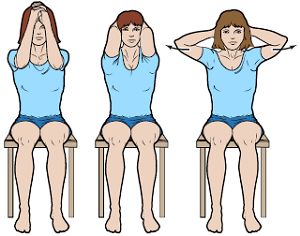
Figure 10. Shoulder wings - Go back to the starting position.
Repeat 10 times.
Elbow bends
Do this exercise with one arm at a time.
-
Start with your arms relaxed at your sides with your elbows straight and palms facing forward (see Figure 11).
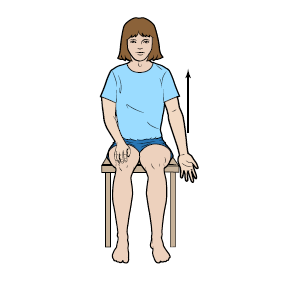
Figure 11. Palm facing forward -
Bend your arm at your elbow, aiming to touch your shoulder (see Figure 12).
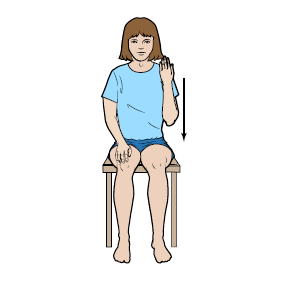
Figure 12. Bend your arm at your elbow - Go back to the starting position.
- Repeat this movement with your other arm.
Repeat 10 times with each arm.
Forearm rotations
- Rest your forearms on your lap with your palms facing down.
-
Lift one arm slightly. Turn your palm so it’s facing upward (see Figure 13).
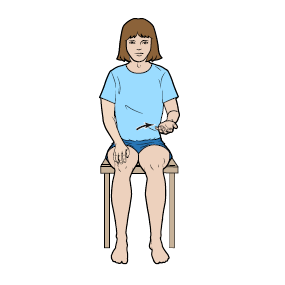
Figure 13. Lift your arm and turn your palm so it’s facing up -
Turn your palm so it’s facing down (see Figure 14). Go back to the starting position.
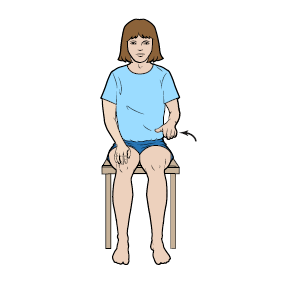
Figure 14. Turn your palm so it’s facing down - Repeat this movement with your other arm.
Repeat 10 times with each arm.
Wrist circles
Remember to only move as far as you can without feeling pain.
- Start with your arms at your sides. Bend your elbows to a 90-degree angle with your palms facing down.
-
Move your wrists in a circle, aiming to have your palms face the ceiling (see Figure 15). Try to keep your forearm still.
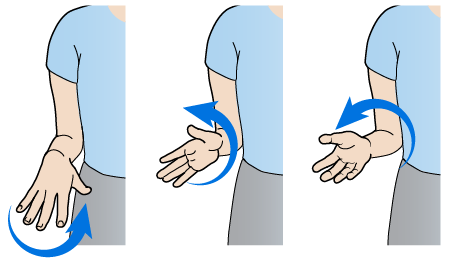
Figure 15. Move your wrist in a circle
Repeat 10 times. If you do this exercise with 1 arm at a time, repeat 10 times with each arm.
Finger bend
- Place your forearms on a flat surface, such as a table or your lap.
-
Make a tight fist, then open your hand and extend your fingers until they’re straight (see Figure 16).

Figure 16. Finger bends - Relax your fingers before repeating.
Repeat 10 times. If you do this exercise with one arm at a time, repeat 10 times with each arm.
Finger stretch
- Place your forearms on a flat surface, such as a table or your lap.
-
Slowly spread your fingers apart, then bring them back together (see Figure 17).

Figure 17. Finger stretch
Repeat 10 times. If you do this exercise with 1 arm at a time, repeat 10 times with each arm.
Deep breathing exercise
You may want to end your exercise session with another 5 reps of the deep breathing exercise.
Support services
We encourage you to keep doing all the activities you enjoy. Talk with your healthcare provider or lymphedema therapist if you have questions about your daily activities or lymphedema. The support services below may also be helpful.
American Cancer Society (ACS)
www.cancer.org
800-227-2345
The ACS shares information about lymphedema diagnosis and treatment
Lymphatic Education & Research Network (LE&RN)
www.lymphaticnetwork.org
516-625-9675
The LE&RN shares information about lymphedema diagnosis and treatment as well as resources and educational materials.
National Cancer Institute (NCI)
www.cancer.gov
800-4-CANCER (800-422-6237)
The NCI shares information about lymphedema diagnosis and treatment.
National Lymphedema Network
www.lymphnet.org
415-908-3681
The National Lymphedema Network shares information about lymphedema diagnosis and treatment, as well as resources and educational materials.
Step Up, Speak Out
www.stepup-speakout.org
Step Up, Speak Out shares resources and educational materials about lymphedema.